The Ui.Marketing Business App and Conversations AI Beta are only available in the US and Canada.
The CRM inside your Ui.Marketing Business App provides you with a powerful, centralized platform for managing all your customer relationships and new business opportunities. Built to streamline your sales process and improve customer engagement, it helps you organize contacts, track potential deals, and automate key communications to drive your business growth.
What's Included
The CRM features the following core tools:
- Contacts: Manage all individual customer information, import/export data, and launch email campaigns.
- Companies: Manage business accounts, linking associated contacts and open opportunities.
- Activity Feed: A complete history of all customer interactions and engagement.
- Opportunities (Sales Pipeline): Track and manage potential sales from lead to closed deal using a visual board or table view.
- Tasks: Schedule and manage follow-up activities for yourself or your team.
- Lists: Create segmented lists of customers or businesses (Smart Lists) for targeted communication.
- Leaderboard: Monitor team rankings and motivate sales growth.
- Forms: Capture leads from your website directly into the Client Manager.
- My Meetings: Schedule and manage appointments with prospects and customers directly.
Contacts
The Contacts section of the CRM streamlines your daily operations by eliminating manual data entry through bulk import/export capabilities and enabling automated campaign scheduling. This ensures your communication with customers is consistent and timely while keeping all customer records detailed and accurate.
Importing Your Existing Customer Data
Before you begin:
- Confirm that each contact entry includes at least one of the following: First name, last name, email, or phone number
- Ensure each company entry includes a company name
- Import limits: Maximum file size is 5 MB, which typically allows for up to 35,000 contacts per import
- Prepare your data with unique identifiers for bulk updates (Contact ID, External ID, or email)
-
Step 1: Upload CSV
Click Import in the top right corner of the contact table. You'll be guided through a three-step process to complete the import.
Upload a CSV file containing the data you want to import, then click Next. You can use the optional CSV template to ensure your file is correctly formatted.

-
Step 2: Map fields
- Map the fields from your CSV file to the corresponding fields in the CRM for contacts and companies. The system will attempt to auto-map columns to existing CRM fields, but you can manually adjust these mappings as needed
- For each column, choose whether it relates to a contact or company, then select the specific CRM field to map it to. Once you've completed the mapping, click
Next 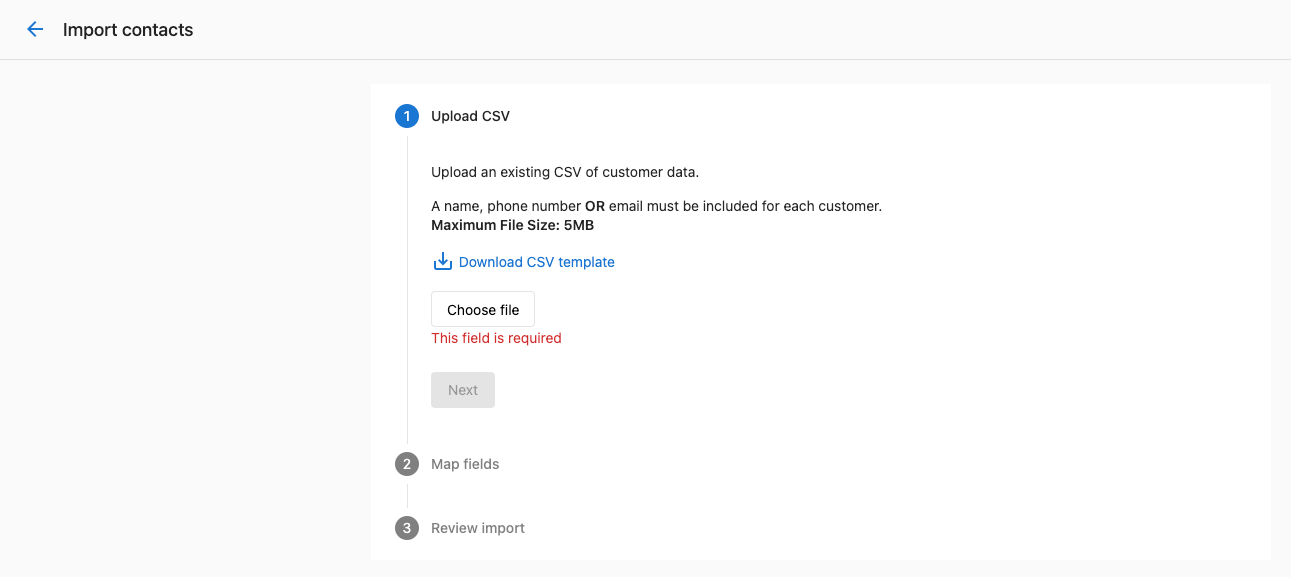
-
Step 3: Review import
- Review the records to be imported and deduplication settings
- Choose update behavior:
- "Update existing records" - Overwrites existing contact data when matches are found
- "Skip existing records" - Leaves existing contacts unchanged, only imports new ones
- After confirming your settings, click Finish.
Companies
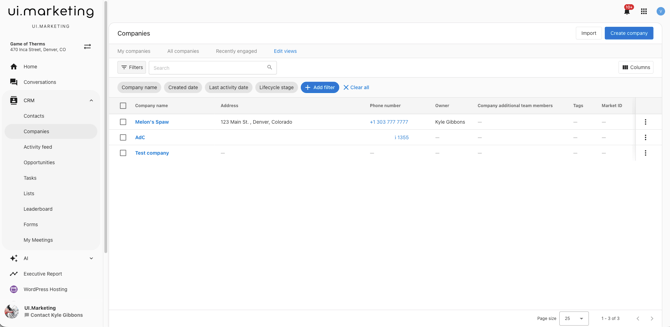
Companies in the CRM enables you to maintain comprehensive records, score leads for better prioritization, and ensure no important business interactions are missed.
-
Navigate to companies
-
Go to Ui.Marketing Business App > CRM > Companies
-
-
Set up company profiles
- Add new company information using default fields
- Configure custom fields based on your business needs
-
Configure lead scoring
- Navigate to Ui.Marketing Business App > Administration > Score
- Set up positive and negative scoring criteria
- Enable automated lead prioritization
-
Start logging activities
- Click into company profile pages
- Record communications and sales activities
- Track engagement throughout the sales process
Activity Feed
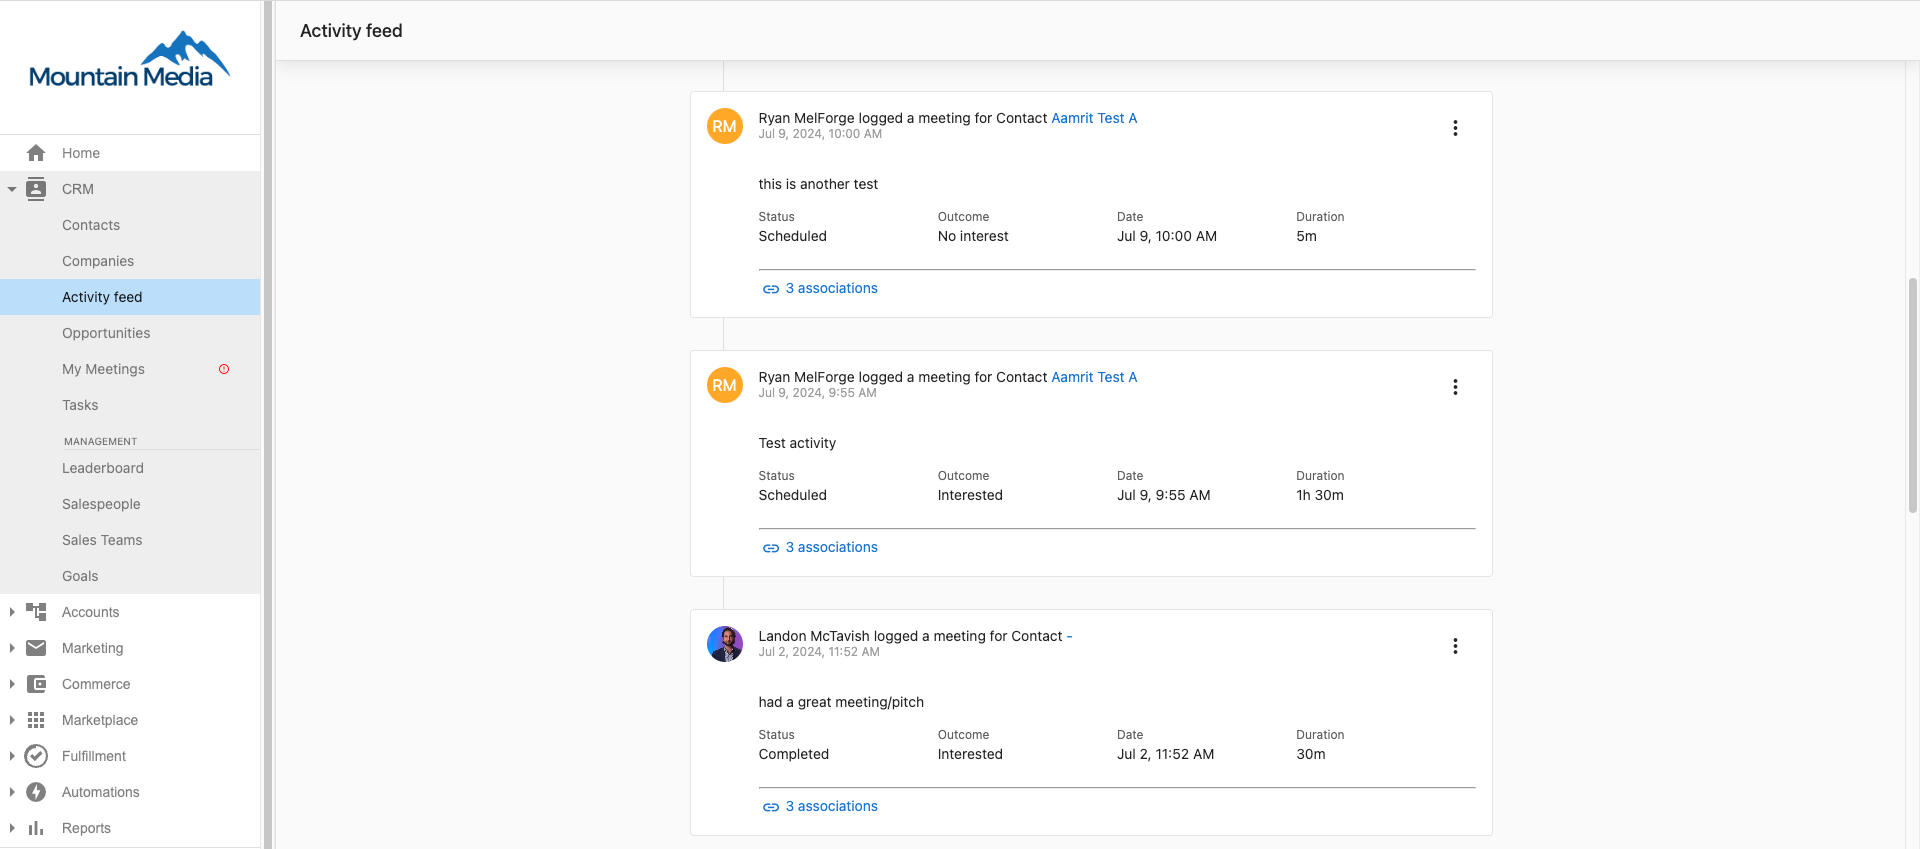
The Activity Feed eliminates information silos and ensures no important sales interactions are missed, enabling better team coordination and more effective sales management.
Use the top navigation to filter through all the CRM activity to help find what you need. You can also create a custom search by clicking on Edit views in the top navigation bar.
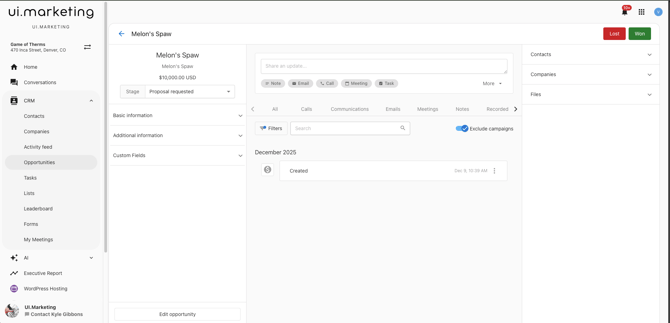
Opportunities
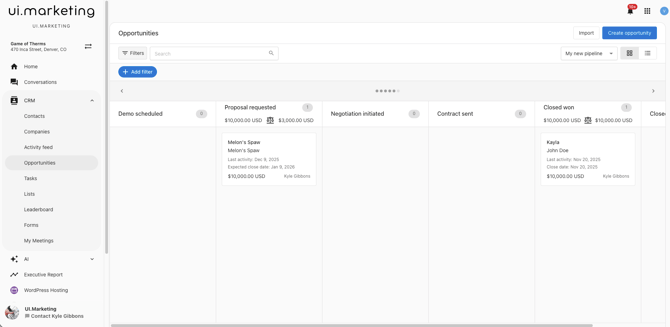
Opportunities eliminate guesswork in sales forecasting and ensure your team focuses time and effort on the most promising prospects while maintaining comprehensive tracking of all potential deals.
Creating Opportunities
- Go to Ui.Marketing Business App > CRM > Opportunities.
- Click Create opportunity in the upper right-hand corner.
- Enter in the Opportunity information and click Create.
Editing/Updating Opportunities
At any point, you can click on an Opportunity and update it with more information, update the stage, add an activity, or mark the opportunity lost/won.
Tasks
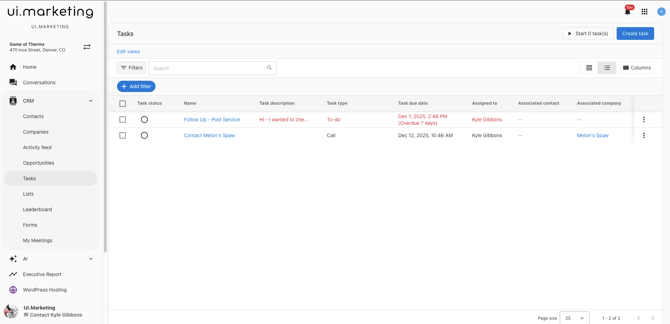
Transform your sales activity management with organized task tracking that ensures consistent follow-up and prevents missed opportunities. Tasks eliminate the risk of forgotten activities while providing clear accountability and progress tracking across your entire sales process.
Lists
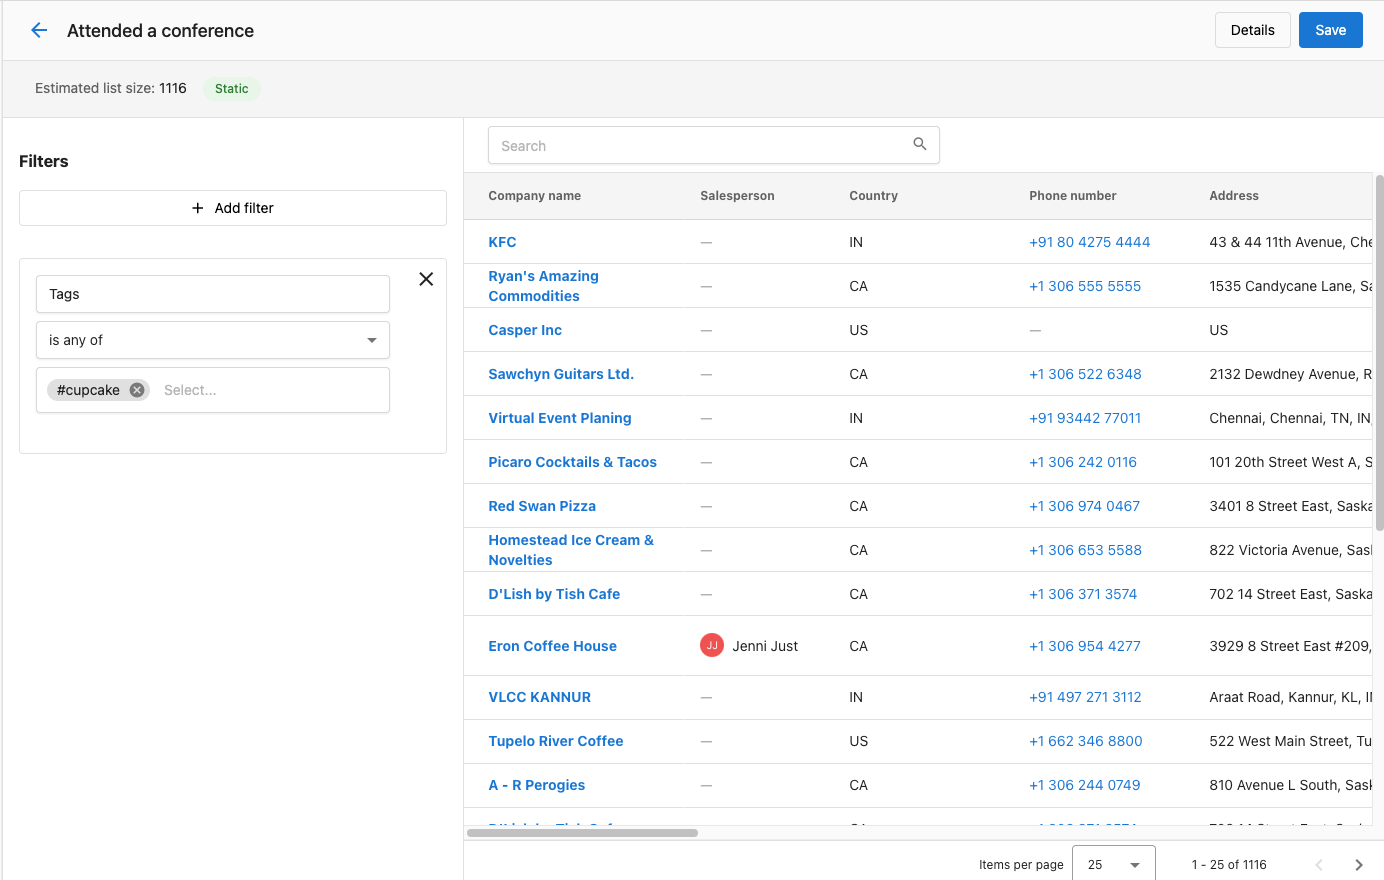
Transform your lead management with organized, targeted groupings that enable automated nurturing and more effective campaigns. Lists eliminate manual sorting and enable real-time segmentation, ensuring your marketing efforts reach the right audience at the right time while reducing administrative overhead.
Static vs Smart Lists
Static lists are manually managed and don't change unless you manually update it. It is great for fixed groups like event attendees.
A smart list updates automatically based on rules you set, such as contact engagement or behaviors, making it ideal for dynamic targeting. For example, you want to target users who opened a specific email campaign.
Leaderboard
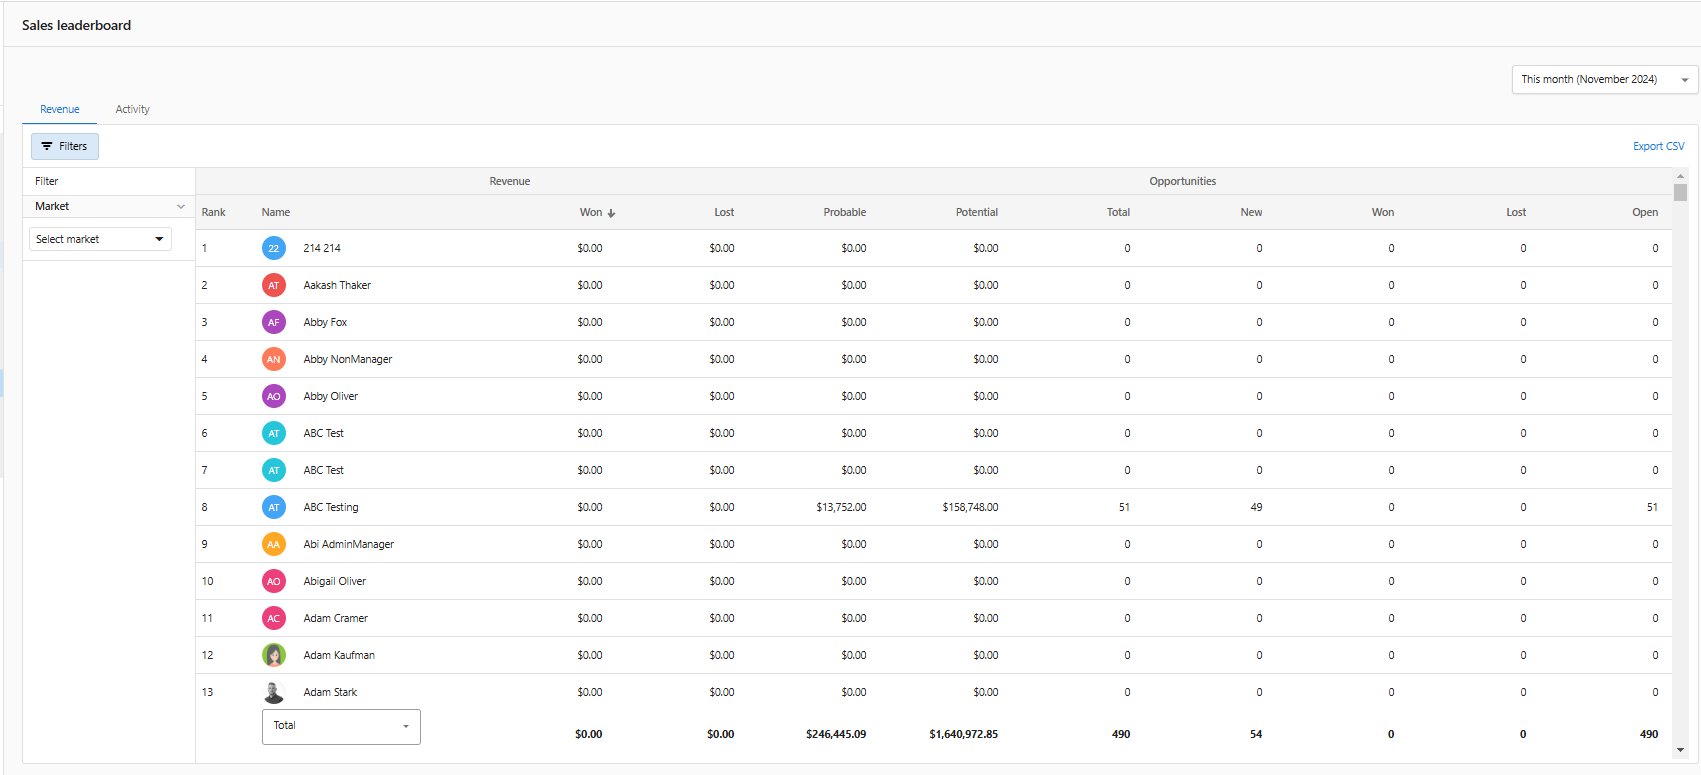
The sales leaderboard is a powerful tool for you and your team to compare performance metrics and encourage healthy competition amongst your team. This comprehensive performance tracking system showcases all of your salespeople and important revenue metrics in an easy-to-understand format. With advanced filtering options and export capabilities, the leaderboard provides valuable insights into team performance and individual achievements. The leaderboard serves as both a motivational tool and a data source for strategic sales management decisions.
Forms
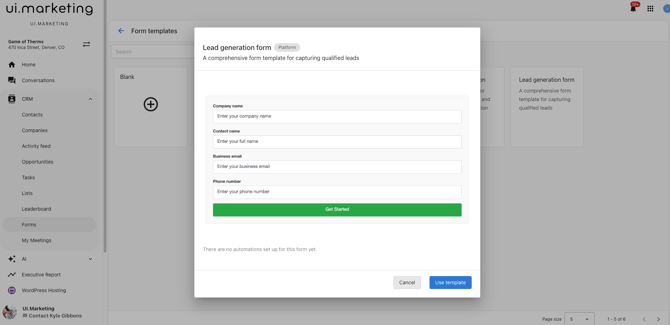
Forms let you capture leads, qualify prospects, and trigger automated follow-ups from any website that lets you embed HTML code. Start with pre-built templates, customize with AI-generated styling, and connect to your CRM, email campaigns, and more.
Creating a Form
- Go to CRM > Forms
- Click Create form and choose a template (Lead Generation works great for most cases)
- Add or customize fields using the drag-and-drop builder
- Style your form with AI or custom CSS
- Set up automations to handle submissions
- Embed on your website or share a direct link
My Meetings
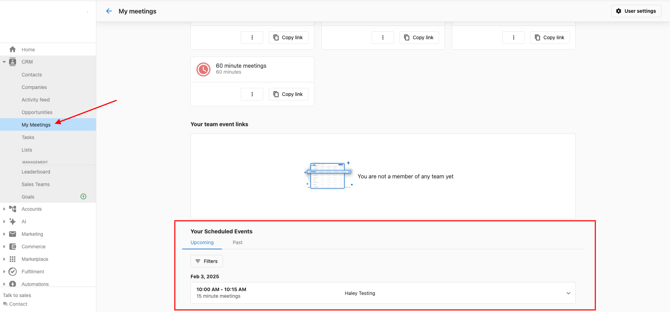
The meeting scheduling features help you set up and manage meetings with prospects and customers effectively. This comprehensive scheduling solution eliminates the back-and-forth of manual meeting coordination by providing customizable booking links and automated scheduling. With support for different meeting types, team booking capabilities, and AI-powered features, My Meetings streamlines the entire meeting process from initial booking to follow-up.
Create Booking Links
- Go to the Ui.Marketing Business App > CRM > My Meetings.
- For new users, you will need to complete the initial setup:
- Set your booking URL: customize your booking URL with a unique name.
- Connect calendar: Connect your Google Calendar to check the conflicts and create events.
- Choose meeting app: Connect a meeting app to automatically populate meeting links in invites.
- Set availability: Configure the hours you're available based on your timezone.
- Create your booking links
- Access multiple meeting types with specific lengths.
- Click Copy link under any meeting type to share with prospects.
- Use the menu icon and View event link to book meetings on clients' behalf.
- Share and manage
- Each salesperson has unique booking links.
- View scheduled events in Your Scheduled Events tab.
- Toggle between upcoming and past meetings.